


Garden bar ideas
When the warm weather hits, there’s nothing like being able to kick back in your garden with a beverage – especially if you’re lucky enough to have your own garden bar.
Stocked up with your favourite drinks, designed exactly as you like it, without having to leave your home. It’s perfect!
Garden bar ideas
Wondering how to create a garden bar? Take your home entertaining to the next level with an impressive drinks station using these top ideas…
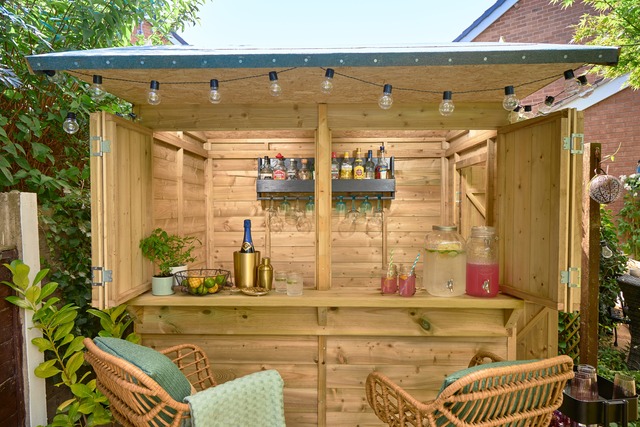
Instant garden bar
If you have the space, and the budget, getting a garden bar from somewhere like Forest Garden is a great idea.
This 4×6 Reverse Apex garden bar is a ready-built entertainment space. It’s perfect for those with a more compact space, that still want that outdoor bar feel.
All you need to do is decorate and stock it up with your favourite tipples – and invite your friends over of course!
- Shiplap PTR 4×6 Reverse Apex Garden Bar, £926.99 from Forest Garden – buy here
What do I need to create a garden bar at home?
Transform your home on a budget without a complex structure with these garden bar tips from event experts, Groopeze.
Choose the right spot
Choose a location that works with your garden layout. The best spots for a garden bar are places that get a bit of sun, but ideally some natural shade, too.
A sheltered corner near the house is ideal, especially if you’re wanting to run electrics or plumbing out there.
If you’re working with a smaller space, a balcony or patio can be transformed into a cosy bar area with a clever layout.
Build the structure
You don’t have to be a master carpenter to build a great-looking bar.
Pallets are a popular choice because they’re affordable, and easy to work with. But don’t be afraid to repurpose an old potting bench, sideboard or even a vintage wardrobe. Just make sure it’s weatherproofed with an outdoor wood treatment.
For something more permanent, a small timber-framed shelter or summerhouse-style bar gives you flexibility in all weathers.

Sarah Rumbles, Design Expert at Crane Garden Buildings, said: “The beauty of using a fully insulated building is that you can kit it out properly, with a fridge, bar shelves, lighting, even a cosy seating area, without worrying about the weather. It’s like having an extension of your home, just a few steps down the garden.
“We make everything to order, so whether you’re after something sleek and modern or full of rustic charm, we can help bring your garden bar ideas to life.”
Think about storage and layout
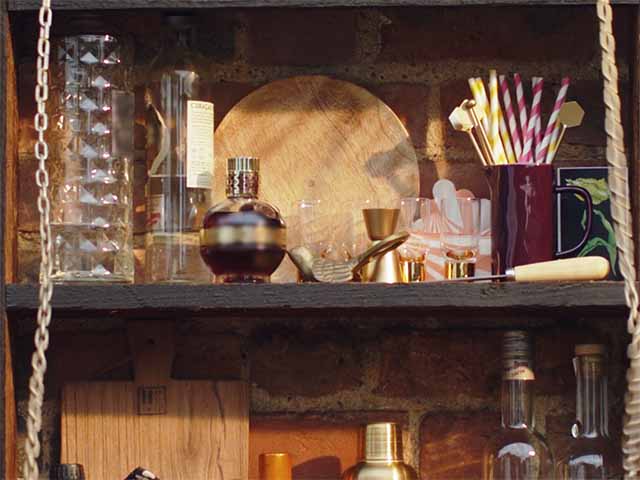
However you are laying out your garden bar, you’ll want shelves for bottles and glasses, hooks for bar tools, and ideally a fridge or cool box for drinks.
Use stackable crates, old kitchen cabinets or even upcycled wine racks to keep things organised. Position your worktop at a comfortable height for mixing drinks and keep the layout practical.
You don’t need to cram in everything you’d find in a real bar. A good selection of spirits, mixers and some nice glassware will go a long way.
Add some character
This is where you can really have fun. Give your bar a name, add a hand-painted sign and hang up some pub-style decor.
Festoon lights or old fairy lights strung overhead instantly make the space feel welcoming and festive. Repurpose items like beer pump handles, chalkboards, or vintage tin signs for a relaxed, nostalgic vibe.
A couple of bar stools and a small bistro table can make the space feel more like an outdoor extension of your home.
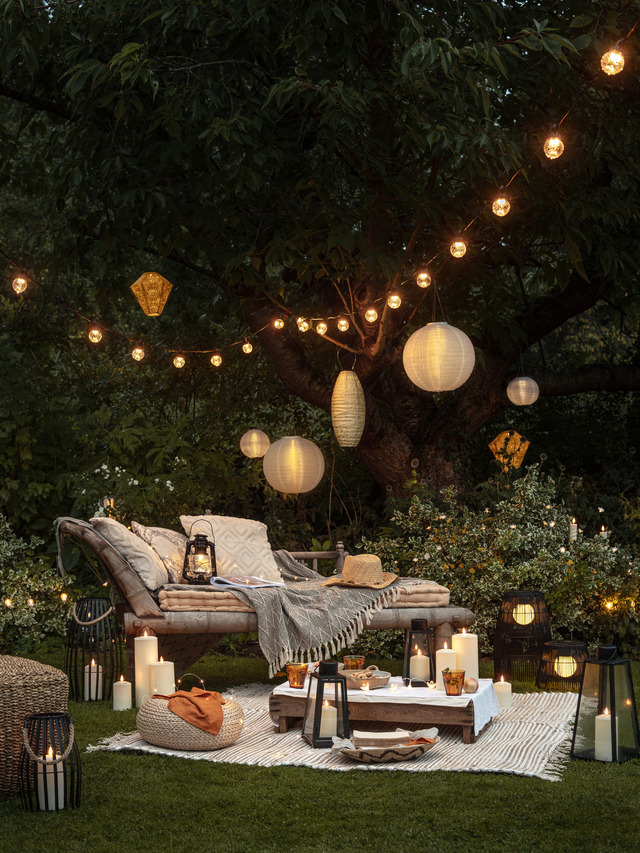
– Outdoor lighting ideas, available from a selection at Lights4fun
Cover your bases with shelter
The UK weather isn’t always on our side, so make sure your bar area has some form of shelter.
A pergola with a retractable canopy, a sail shade or even a large garden umbrella will let you enjoy the space rain or shine.
If you’re going bigger, a lean-to with a corrugated roof or a polycarbonate sheet is a practical DIY upgrade. Just be sure the structure is secure and complies with local planning rules if you’re building close to a boundary.
Keep it warm and welcoming
To make your bar useable throughout the year, think about warmth and lighting.
A fire pit nearby creates a brilliant focal point and adds heat, while a plug-in heater or gas patio heater can extend your outdoor season.
Solar lights or mains-powered garden lights give a lovely glow in the evenings. And don’t forget blankets and cushions for a cosy touch.
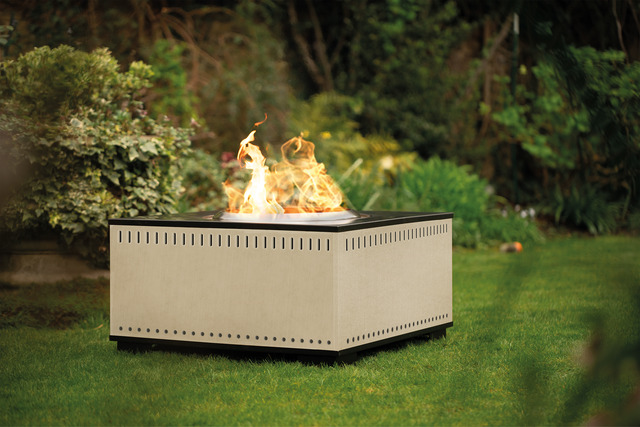
- Chesneys large smoke fire pit, £595 from Direct Stoves – buy here
Plan your drinks menu
Stock it with what you love to drink. You don’t need a full bar setup, but a good gin, a rum, a whisky, some cocktail basics and your favourite wines or beers are a great start.
Keep mixers, fresh herbs like mint or rosemary, and fresh citrus to hand. A drinks menu on a chalkboard adds charm and helps guests know what’s on offer.
Don’t forget the soundtrack
Music makes a big difference to the atmosphere. Set up a small outdoor speaker, or if you’ve got a waterproof smart speaker, link it up to a playlist you’ve made just for the occasion.
Whether it’s jazzy Sunday brunch tunes or something more upbeat for a summer evening, the right music completes the vibe.
Is it legal to have a bar in your garden?
Many people question whether it’s ok to have a bar in your garden, as pubs and bars need a license to sell alcohol.
The key is in the wording, as in a garden bar you’re sharing your space and alcohol with friends free of charge, it isn’t illegal.
If your garden bar was so popular you wanted to turn it into a real venue and sell alcohol and other drinks from it, you would need a special license.
Do garden bars add value to a property?
Whenever we do any work on our gardens, be that redecorating a room, landscaping a garden, or adding a garden bar – you want to think the money you are spending is adding value to a property.
Obviously you want to enjoy the changes you make, but it helps if you know you’re increasing the value of a property rather than devaluing it.
Thankfully, the consensus seems to be that a garden bar does in fact add value to a property – as much as 10% on top of the original property value.
However, this is only the case if it is built to a high quality, and with connections to electric and running water. So, if you want a garden bar that is going to impact your property price, it’s best to get the professionals in!
Do you need planning permission for a garden bar?
As long as your garden bar falls under the remit of a permitted development, you won’t need planning permission for a garden bar.
The official answer depends on the size and design of the structure. It will also depend on the intended use, and the regulations set by your local planning authority.
A permitted development allows you to make certain changes and additions to your property without needing formal approval, however these come with limits.
These limits will include what the size and height of the garden bar is, it’s location within the property, and whether it will be used for commercial purposes.
The structure must not exceed a certain floor area, and there will be a maximum height of structures set by your local planning authority.
In terms of location, some authorities will have specific requirements regarding the distance between the garden bar structure and the boundary of the property, or other buildings. It is really important to be aware of your local restrictions before beginning work on your garden bar.
If you plan to use your garden bar in a commercial way, running a business and serving alcohol, then different rules will apply. You will need additional permissions and licenses, and will need to check with relevant bodies to ensure yours is complying with regulations.
Is it against the law to play loud music in your garden?
If you want to create a proper vibe at your garden bar, with outside music and dancing, it’s worth noting that in the UK you are legally not to play loud music outdoors after 11pm.
At that point it might be best to quieten things down, or take the party inside the house.
DIY garden bar
Here, experts at garden wood treatment company, Cuprinol, share a step-by-step DIY guide…
You will need:
- 5L Cuprinol Ducksback in your favourite colour
- Planks of treated rough-sawn timber (150mm x 22m, 8.5m total length)
- Rough-sawn batten to hold timber (47mm x 22m, 2m total length)
- 2-inch paint brush
- 45mm wood screws (a box of 50 should do)
- Masking tape
- Hacksaw or bolt cutter
- Tape measure and pencil
- Hand Saw
- Electric drill, with drill bits
- Small exterior hinges and screws
- Metal chain
- Hooks and eyes
Step 1: Measure and cut the wood to size
You’re looking for:
- Treated, rough-sawn timber cutting lengths:
90 cm lengths of 150mm x 22m x6
60cm lengths of 150mm x 22mm x2
55.6cm length 150mm x 22mm x 3 - Rough-sawn batten cutting lengths:
55.6cm lengths of 47mm x 22m x3
You’ll need four of the 90cm lengths of 150mm x 22m treated rough-sawn planks for the door, and the other two 90cm lengths will be for the vertical sides of the box. The two lengths of 60cm are to go horizontally across the door to hold it together, while the three lengths of 55.6cm are for the top, bottom of the box, and middle shelf.
The first two lengths of batten are for the additional casing that will face outwards from the inside of the box, positioned at the top and bottom. They’ll offer the box a bit of extra support, and make sure your bottles, glasses and shakers don’t fall off the bottom shelf when the door’s open. The final bit will be used as a bracket to fix the whole bar on the wall – we’ll come back to that in a bit.
You should have a little bit of each left over which will make perfect firepit fuel for the late summer evenings.
Step 2: Fix these pieces together to form a box
Arrange the four lengths of timber you’re going to use for the box in a rectangle shape (make sure the top and bottom pieces sit in between the vertical sides, rather than on top of them) and screw them together at 90-degrees with 45mm exterior wood screws – use two or three at each corner.
When you’ve completed the box shape, fix the third length of 55.6cm timber into the middle of the box, to become a midway shelf. Then fit and fix your two lengths of batten at the top and bottom of the box as above – again, they’re in between the vertical sides of the box, just like the shelf.
Top tip:
Create some narrow pilot holes in the wood with your drill, so the screws can find some grip on their way in, and preventing the likelihood of the wood splitting.
Step 3: Attach the door and add hinges
For the door, lay four 90cm lengths of 150mm x 22mm side by side, then fix the two 60cm pieces horizontally across to hold everything together. Make sure they’re flush with the head and base of the door, and use the same screws you used for the box. One screw per plank will do nicely, so four screws per horizontal plank.
Attach two hinges to the base of the box, line up with the door and fix. You should now have a big, sturdy box with a central shelf and a hinged door.
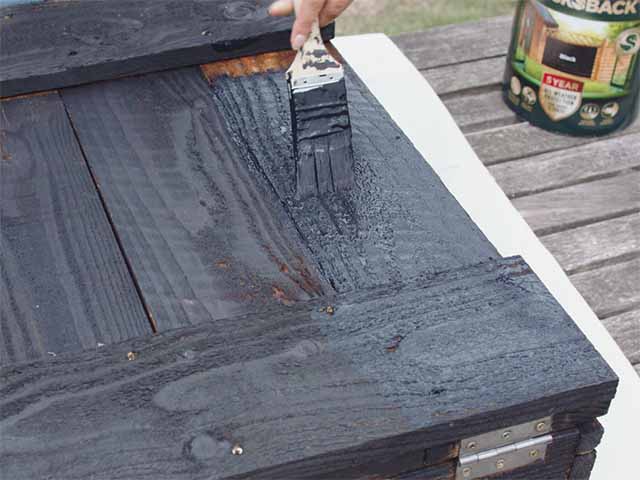
Step 4: Apply two coats of Cuprinol Ducksback
Now it’s time for painting. Put some masking tape over your hinges, and apply a coat of Ducksback to everything else. Use a sturdy 2″ brush to get into all the nooks and crannies, painting in the same direction as the grain for the best finish. Allow to dry, then give it a second coat.
Step 5: Attach fixings to hold the door in place
To make sure the door stays shut, screw eyes and hooks onto the exterior of the bar.
Top tip:
Choose exterior hooks and eyes so they don’t go rusty in the rain.
Step 6: Attach chain to door
To keep the door open at a level, 90-degree angle, you’ll need to add two supporting chains.
While waiting for your second coat of Ducksback to dry, which can take up to an hour, use bolt cutters to chop two lengths of chain to roughly 127cm each (the exact length will differ slightly depending on where you put the eyes and hooks so measure carefully before cutting). Finish by fixing your bar to securely to a wall.
And that’s pretty much it – there’s a new bar in town. Customise it however you see fit. We’ve chosen some weather-proof metallic lettering and decorations, which you should be able to find at your local hardware store or garden centre.
And finally…
Stock the bar with your favourite drinks, glasses and shakers – and get ready to tell the tale of your new garden bar at the next party.